Serverless Blogging using Hugo in Azure
- 'Setting up the project'
- 'Working with Custom Domains'
- 'HTTPS and Domain Validation'
- 'Azure DevOps with CI/CD'
- 'Deploying the Blog'
This post was written about how I created the blog as it looked when it was first launched. Since then, the domain has changed as well as the way I set up the CDN solution, so be aware that it might not reflect the blog as it looks today.
I’ve always wanted to have a website that I can manage on my own, without too many fancy settings to confuse me but with enough flexibility to adapt it to my needs. I’ve given it a few attempts at keeping an active blog on WordPress, but I always end up finding it too inconvenient for my needs. Call me picky, but I like being able to change things without too many settings and extensions while still being able to simply write a blogpost and publish it. Not to say that WordPress isn’t quick and easy, and I’m not doubting that my lack of knowledge about it comes into play, but I’ve found it tricky to edit or implement even small details such as showing code in a proper format.
So grab a drink, have a seat and let me tell you about my adventures in creating a new blog using Hugo, buying a custom domain, redirecting it using Cloudflare to my Azure CDN endpoint connected to my Azure Storage where I store my blog as a static website, setting up a GitHub repository and Azure DevOps and connecting the two with build and release pipelines to automatically update my blog as soon as I push new changes to my repository. If that sentence didn’t scare you off it’s time to buckle up, because I had no idea about how do to most of those things before starting. In this post I’ll be explaining the steps I took to fail, and what eventually worked out.
It started with Simon Wåhlin mentioning to me that he had migrated his blog (with considerably more content than mine) from WordPress to using Hugo to create it from Markdown (.md) files and hosting it in Azure as a static website. That and his blog post about it gave me inspiration to try the same, but first I had to figure out where to begin.
Setting up the project
I signed up for a trial account in Azure and created a resource group, a storage account and enabled static website on it. You will also need to specify your index file name and error document path name, this should be set to index.html and 404.html respectively, unless you’re using another setup in Hugo. After downloading Hugo, I chose a theme and started a new website with one blog post according to the quickstart guide.
I quickly read up on the documentation of Hugo, and generating the actual blog is as easy as writing Hugo in the console when you’re in the root folder in a console, this generates the blog in a folder called public. I like using Visual Studio Code whenever I can, and luckily it works great with Markdown, HTML and CSS files. It also has a neat extension for Azure Storage which lets you deploy your files to your static website container called $web which hosts your website, accessible through a generated endpoint looking something like https://mystorageaccountname.z16.web.core.windows.net.
I right clicked my new public folder in VS Code and used the extension to upload the contents to my new static webpage, but while my blog was technically working there were a few more steps I wanted to check off before I was done. The most obvious one was to add a custom domain name, so I went soul searching for what to call my blog - and to figure out what I’d realistically be willing to pay for a domain name without knowing what I was doing. I ended up with pipehow.tech for a cheap price and the next step was to figure out what I needed to do to make my blog show up when I browsed to it. Note that my explanations of these parts may be lacking since the world wide web is far from my expertise, but since I made it work you can too.
Working with Custom Domains
After a little research it seemed that I needed to create so-called CNAME records in the DNS settings of the domain - more or less mapping the domain to another one. Setting DNS settings for my domain would cost me extra at the provider where I bought the name so after looking around I ended up at Cloudflare. Cloudflare is a service provider that sits between your domain and your content and helps provide a sweet browsing experience for the user through DDoS mitigation, security stuff, many more things and last but not least the DNS settings I was after. They offer free hosting for one domain, so I jumped on that offer and followed the instructions for what to do. For Cloudflare to be able to do any work traffic needs to be routed through them, and the way to do that is to replace the nameservers that your provider has set for your domain with the servers that Cloudflare provides you. This means that when a user browses to pipehow.tech the browser is told to go check at Cloudflare’s DNS settings for where to find the content to present to the user. Setting nameservers was free at my domain name provider so I simply changed the settings to Cloudflare’s servers and didn’t need to configure anything else, in fact I removed most of the other settings I had looked at for the DNS just to make sure they didn’t have any impact.
You might be able to solve the hosting puzzle without creating an Azure CDN, but I followed Microsoft’s tutorial on how to set one up for the static website to enable HTTPS on a custom domain connected to my static website endpoint. Cloudflare provides SSL for my domain as well, so you might be able to figure something out with mapping a CNAME to the static website endpoint directly, but it’s not something I’ve tried. At this point I started hitting some obstacles, but luckily there is a vast amount of information on out there on many - but not all - parts of the setup. There are plenty of articles on the subject, but even some from last year had incorrect information in them because of what I assume is rapid development in Azure. The goal I set was to make the site work as both pipehow.tech and www.pipehow.tech on both HTTP and HTTPS, even if some would be simple redirects. From following the tutorial and setting up the CNAME record in the DNS settings at Cloudflare I managed to get the site working on https://www.pipehow.tech/ but I had the error “The account being accessed does not support http” when trying to access it through HTTP. What I then did was to disable the setting “Secure transfer required” in the configuration of my Storage account, this worked but it wasn’t the cleanest solution. I later enabled it again after properly adding page rules to my Cloudflare settings to solve the issue.
Below are my DNS settings in Cloudflare, note that you need to replace the blue CDN name with your own Azure CDN configured against your static website endpoint. Something to note here is that you need to make sure your DNS records are managing both DNS and HTTP proxy (CDN) (seen on the orange clouds), otherwise Cloudflare won’t be able to manage your traffic.

I originally wanted to make pipehow.tech the main address, and not www.pipehow.tech, but at least to my understanding it’s tricky to make that work because of how the root of the domain can’t have a CNAME record of its own, better explanations can be found online with this article being a good start. Unless you have a CNAME record mapped to your Azure CDN endpoint you can’t create a custom domain, which practically means that you while you can create www.pipehow.tech as a custom domain in Azure, pipehow.tech won’t work.

HTTPS and Domain Validation
There is however a way to get past this error, and possibly a way to solve the problem. Solving the problem does however rely on you having access to the email address listed on your domain’s registration record (WHOIS registrant) that Azure sends the verification email to, and even then this solution is just speculation on my part. In cases where you can’t afford any downtime while setting up your custom domain mapping, there is a way to let Azure verify your custom domain connection “without interruptions while the DNS mapping occurs”. Following Microsoft’s tutorial you would create another CNAME record pointing from (in my case) cdnverify.www.pipehow.tech to cdnverify.cdnname.azureedge.net, which would let me prepare all the settings for www.pipehow.tech without remapping the domain. If I also register cdnverify.pipehow.tech (notice the lack of “www”) to cdnverify.cdnname.azureedge.net however, it will let me register pipehow.tech as a new custom domain for my endpoint, but the problem that the previous error message pointed to will still exist.
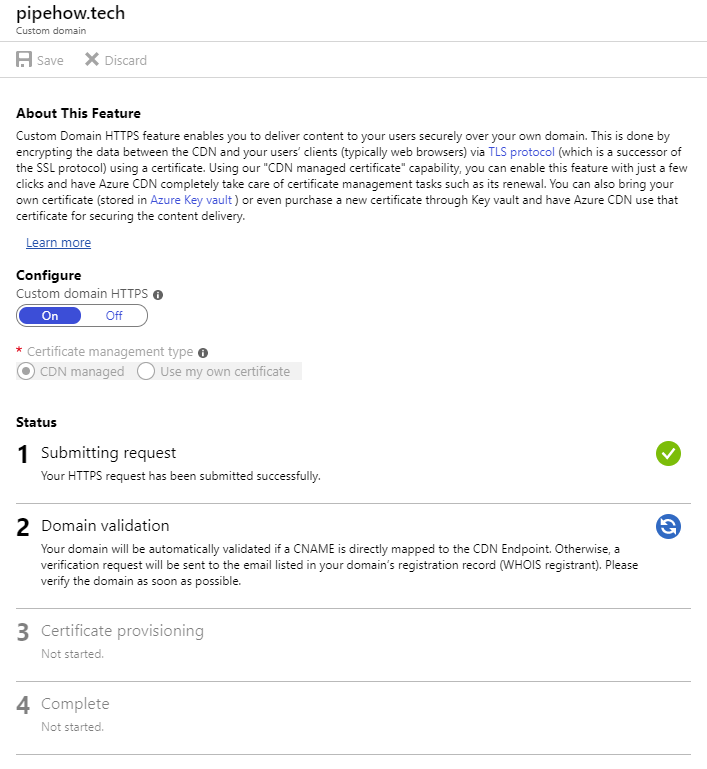
This makes step 2 of configuring HTTPS on the custom domain tricky, since Azure cannot automatically validate the setting. Because I didn’t set up any email @pipehow.tech I won’t be able to verify the domain ownership and therefore I can’t explore this further. My solution was instead to set a few extra settings in Cloudflare and to use www.pipehow.tech as my main website address. Under the Crypto settings I enabled “Always Use HTTPS” and “Automatic HTTPS Rewrites” and then I set two Page Rules to redirect from pipehow.tech to https://www.pipehow.tech/, always forcing HTTPS. This meant I didn’t need to turn off the security settings on my Azure Storage account, so I went back and enabled it.

Azure DevOps with CI/CD
Now I had gotten the site working with my previously set goals of the domain and protocol combinations using page rules in Cloudflare, I had a fully working blog but it felt a bit fragile. I’m not a very paranoid person but keeping the blog only locally on my computer and in my Azure Storage simply didn’t seem optimal, so I decided to take the opportunity to sign up for Azure DevOps and try something called CI/CD, or Continuous Integration and Continuous Delivery. While this is definitely something I like the idea of, I haven’t had much experience with it. The gist of it is that you create an automated build process that triggers automatically when you push new code to your repository. This process can be as simple as you like but the technical goal of continuous delivery is that you should push code changes frequently. Pair this with a build process that catches any bugs through beautiful automated tests that makes sure that it all works, and then simply deploys a new working build to the world.
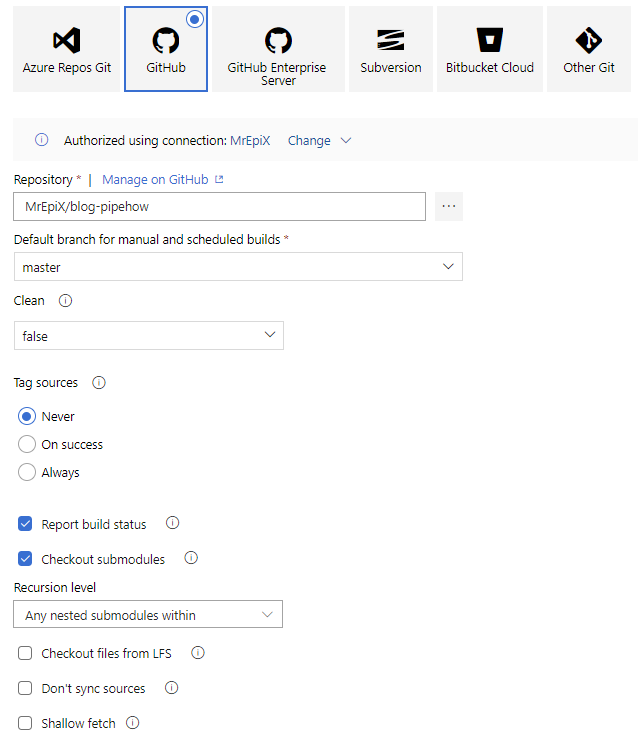
My choice of platform for code is GitHub, so I created a repository for my blog there and uploaded my blog code there to later give Azure DevOps access to. The first step was to create a Build Pipeline, and since I’m not experienced with YAML configurations I used the classic editor to create the pipeline. I authorized Azure to access my GitHub account, selected GitHub and my new blog repository and clicked continue to configure the process. After creating the new pipeline I changed a few more settings in the first step “Get sources” to include submodules since I experienced trouble with loading the Hugo theme the first time I built the blog.
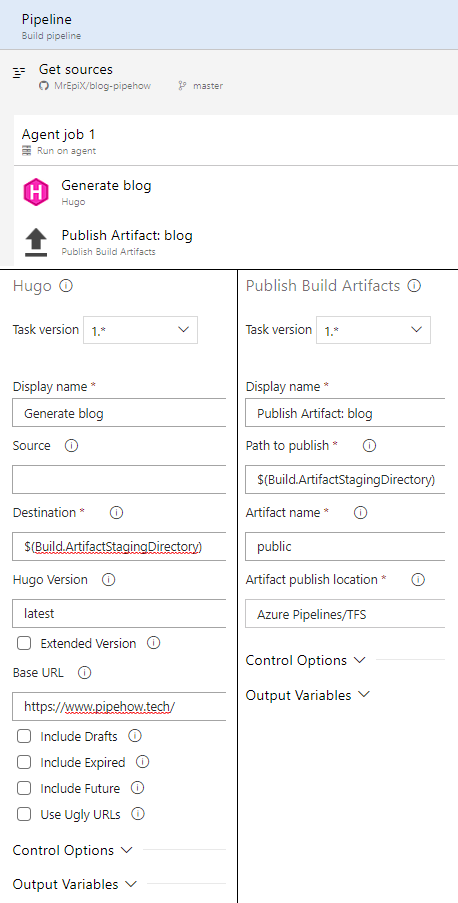
I clicked the plus on the first job agent and added the two build tasks. The first one is the Hugo extension in Azure DevOps that lets you build your Hugo website as a pipeline task. I had trouble with adding the extension after installing it, if you experience the same issue you can try installing a second random extension to see if you can then add Hugo, that solved the problem for me. You can then simply uninstall the second extension. The second task is Publish Build Artifacts, which outputs the generated blog as an artifact of the build, accessible from the release pipeline we’re creating next to deploy the blog. Below are the build pipeline settings, after a successful build you can download the artifact under the summary tab to confirm that the contents are valid before deploying it, this let me catch a mistake I had made with my URL in the Hugo task settings.
Before creating our Release Pipeline to deploy the blog we need to enable continuous integration, this is done under the Triggers tab when editing the build pipeline and makes sure that the build pipeline will run every time you push new code to the specified repository. Confirm that the build pipeline does what you want by running it manually. If your build is successful and the resulting artifact is a properly generated blog, let’s move on to the last step.
Deploying the Blog
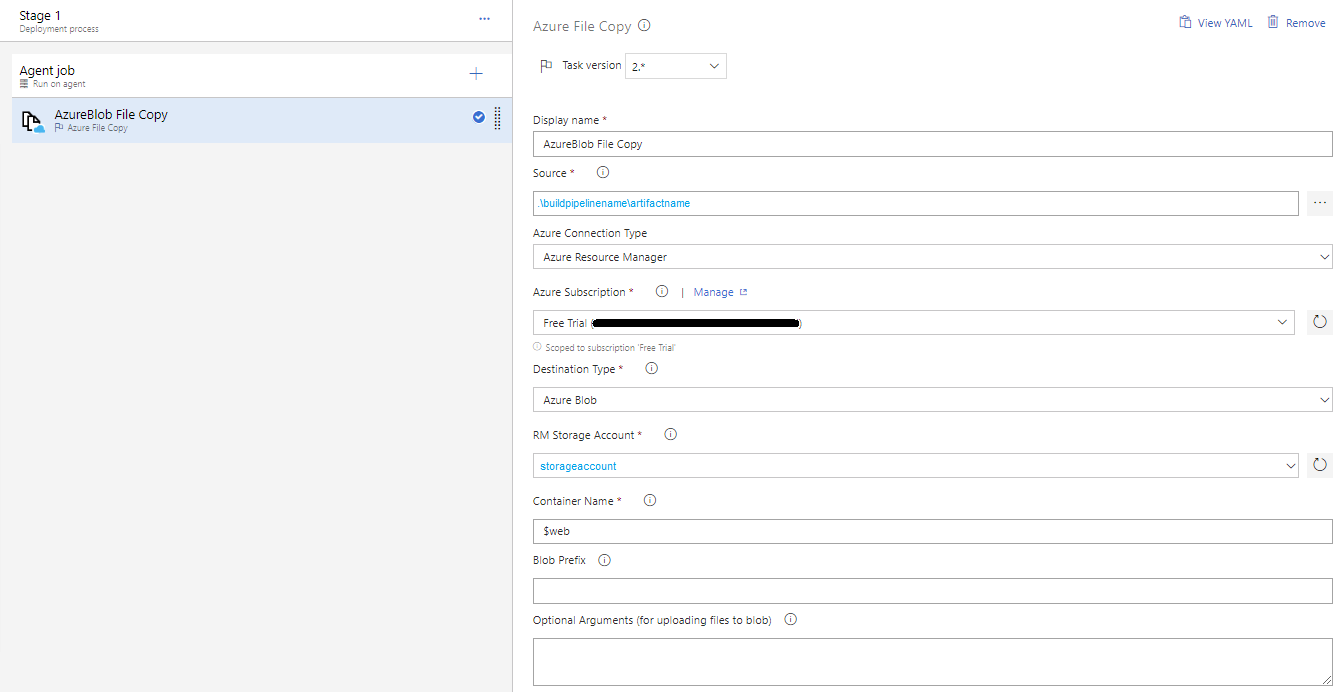
Start by creating a new Release Pipeline, also with an empty job. Add an artifact and specify it to be from the build pipeline we created just before, then click the Tasks tab and add a task to the agent job in the first stage, the one and only task you will need is Azure File Copy.
That’s it! There are a few pitfalls if you want to stray from the templated path and customize things, but it’s a great opportunity to learn some new technologies if you’re thinking of creating your blog or migrating an old one!