OAuth 2.0 Fundamentals for Azure APIs
One of the most frequent situations I encounter when working with Azure services, specifically when working with people working with Azure services, is that there is great confusion regarding how authentication and authorization works when not being able to rely on the Azure CLI, Azure PowerShell or other tools building on the Microsoft Authentication Library (MSAL).
The goal of this post is to build a foundation, a baseline of understanding of how to get past the tricky bits so that we can “just” run our API requests and do the cool stuff once we have our access tokens.
Most Azure APIs build on the same foundation when it comes to authorization, so once we understand how it works it will help us immensely, whether we want to integrate with Azure Blob Storage, or call the API of another service.
Before moving on, let’s define a few terms so that we know that we’re talking about the same thing throughout the post.
AuthN vs AuthZ
Sometimes people throw around the words authentication and authorization interchangeably, but when discussing identity protocols we should have a common understanding of what they mean.
- Authentication - Verifying an identity, that someone is who they say they are.
- Authorization - Verifying permissions, determining access rights and privileges.
This makes it easier for you to correct me in the comments when I inevitably mix them up later.
OAuth 2.0
OAuth 2.0 is the (current) industry-standard protocol used for modern authorization in a variety of services, and is also what the many APIs of Azure are using. We’re going to have a look at how it works on a surface level, and discuss the steps we should understand to be able to retrieve an access token and use it for an Azure API of our choice.
There are also extensions of OAuth 2.0, such as OpenID Connect, which in addition to authorization also implements authentication by providing information about the user in the form of an id token. Microsoft uses OpenID Connect to enable things like Single Sign-On (SSO) between services and (in the future, as of writing) secret-free deployments in Azure DevOps.
OAuth 2.0 is not the only authorization protocol out there, but since it’s increasingly common for companies to implement it as part of their APIs, it’s the topic of today. On this matter, I’d like to quote my coworker and friend Björn:
The good thing with standards is that there are so many.
Tokens
OAuth 2.0 is built around tokens. These are magic strings that contain sensitive information. Since we’re working with Azure which also implements OpenID Connect, there are three types of tokens:
- Access Tokens - Access tokens are needed to use the Azure APIs. They’re typically short-lived, and are retrieved by proving your identity and specifying what resource(s) you want to access and how. They are also known as bearer tokens, which comes from the fact that the token is already verified when issued, and typically lets any bearer of the token use it fully without further proof. It has all the information needed to enter your castle and steal all your treasure.
- Refresh Tokens - When acquiring an access token, a refresh token is also received. This refresh token typically has a longer duration than the access token it came with, and can be used to get a new access and refresh token pair for when the access token expires. This enables prolonging logged-in sessions in applications without leaking a long-lived password or API key. Refresh tokens are very sensitive and must be stored securely, since they are designed to be able to acquire new access and refresh token pairs.
- Id Tokens - OpenID Connect extends OAuth 2.0 with a third token which is not originally part of the protocol. The id token contains information about the user or identity that the token belongs to, which can enable things such as SSO between apps or proving your identity to a third party. Azure AD integrations with services such as GitHub or even Azure DevOps typically implement this.
Compared to having a single API key lying around, the security benefit of working with tokens is great. Access tokens are used in each request to the API, but are generally temporary.
Even if an access token would end up in the wrong hands, the combination of their short duration and the design of refresh tokens limits the risk of malicious actors getting long-term access. Refresh tokens are only sent over the network twice: once when received and once when used to retrieve a new token pair before being discarded.
In this post we will go through different ways of getting tokens. Tokens in Azure use a format known as JWT, which stands for JSON Web Token. If we want to verify that a token has the properties and scopes we expect, we can use the tool jwt.ms built by Microsoft, which lets you parse tokens locally in your browser.
Be careful about copying sensitive information such as tokens into websites outside your control though, this should generally only be done for testing and not with “production” scopes.
Some Definitions
Before talking more about the tokens, I’d like to take a moment to look at some definitions in OAuth 2.0, and what information is actually used when requesting an access token. As we’ll see later, the exact pieces of information that are sent depend on the flow, but let’s get on the same page before it gets more technical.
Roles
There are a few roles defined in OAuth 2.0 that are involved in the retrieval of tokens.
- Resource Owner - The entity in the flow which grants access, often the User.
- Resource Server - The service which hosts the resource, often an API.
- Authorization Server - Handling tokens, access and trust, today it’s Azure AD.
- Client - The application or client requesting access to a protected resource.
The actual actor or entity in each role may change depending on the environment we’re working in, for example it may not always involve a user.
Token Request Parameters
In addition to the roles, there are also a number of defined parameters that are involved in the different parts of the token flows. I’m listing them here as a reference table so that we can easily look back at them later on, when looking at specific examples of Azure authentication flows.
| Name | Description |
|---|---|
| tenant | The tenant parameter is part of the URL path used for all token requests. The value specifies the token issuer, and can be either a specific Azure AD tenant by id or domain name, or one of the following: common for Microsoft accounts, work or school accounts in multi-tenant apps, organizations for work or school accounts only, or consumers for Microsoft accounts only. |
| client_id | An id issued by the Authorization Server to the client app upon registration in Azure AD, provided as identification in requests within token exchanges. In Azure this is also known as the application id, and is not considered secret. |
| client_secret | A secret, or “password”, for the client app. It’s provided to authenticate the client to the Authorization Server. |
| client_assertion | A different form of client_secret, generated using a certificate instead. |
| grant_type | This tells Azure AD which token grant flow is being requested. |
| redirect_uri | The URI that the Authorization Server will send the response to, for certain token grant flows. Since the response contains sensitive data such as access tokens, this URI must be registered in the application in Azure. |
| response_type | This informs the Authorization Server of which type of response the client expects, such as a code or token. |
| response_mode | This decides the way that the Authorization Server will respond to the client, for example putting the token as a query string parameter versus a POST request to the redirect_uri. |
| scope | The scope parameter is the list of permissions that the client is requesting. This is also the permissions that any user of our application may need to consent to, as the Resource Owner. Specifying .default for a resource will request all granted permissions. Resources can be specified by either id or URI. |
| state | A string that will be sent together with the response from the Authorization Server, before the access token exchange. This can be useful to keep track of when and where the token was requested in the app, or to prevent cross-site request forgery. |
| nonce | The nonce parameter is introduced in OpenID Connect and lets the client pass a value that is embedded inside the token response, letting the app ensure that the token can be trusted. |
| prompt | This allows the client to decide the prompt for a user in an interactive login, such as forcing a new log-in, allowing SSO or explicitly prompting for consent. |
| login_hint | Lets the client pre-determine the username or email address of the user logging in, useful for flows involving reauthentication. |
| domain_hint | Lets the client pre-determine the domain of the user login screen, making it a smoother user experience. |
Keep in mind that not all of these parameters are used in any given request. There are also other parameters, even some undocumented ones, but the table above covers most of the ones we’ll talk about today.
If you’re curious about a parameter used later on, refer back to this table!
Applications
There’s one more concept central to Azure and its APIs, which is called applications. To use the Azure APIs we must register an application in Azure AD as a point of trust between our client app, or script, and Azure AD. This application gets an application id, also known as the client id, which is what we use when retrieving tokens.
Some applications are already registered for us by Microsoft, which is why we don’t need to register and specify the id of an application when using things like Connect-AzAccount in PowerShell, since it’s built into the module.
If we want to get tokens for our own applications scoped to certain permissions, or control the token grant flows completely, we need to register an application in Azure AD ourselves. This application can be registered as single- or multi-tenant, and there are options for which type of accounts that can use it in interactive flows, as well as if it should be a public or confidential application. If a redirect_uri is used in the flow we want to use, it needs to be registered with the application.
The application can be granted permissions, or be used for delegated access on behalf of a user. Permissions are also connected to something known as consent, which can be granted to apps either by administrators or by users depending on the context.
This is a vast topic, and we won’t be discussing this in depth today, but you can read more here to learn about access, permissions and consent, or here to learn more about scopes.
Token Grant Types
Getting back to the topic of access tokens, let’s talk about the different ways we can retrieve them. The way we would get a token as a user in an interactive PowerShell session can be very different from how a timer-triggered Azure Function would retrieve one when running in the cloud, and so on.
There are defined patterns in OAuth 2.0 for requesting tokens, and these are known as token grant types, or flows. Sometimes they’re bundled together under the same flows, but I’m going to define them separately.
I will visualize these in the context of a client being able to run HTTP requests, and I’ll use PowerShell as example code, but it works just as well with other tools.
OAuth 2.0 is designed around a few different client profiles, but we think of a client as anything from a PowerShell script running on a server or in an interactive session, to a mobile app or serverless application.
There are several defined parties involved in the flows, but I will simplify the visuals by only showing the client, instead of also showing a web browser (User-Agent) and user (Resource Owner).
Authorization Code
Authorization Code is an interactive flow. It’s typically the solution to pick when we have a user on the other side, such as the classic login screen pop-up. It’s further extended by PKCE, which we will cover separately.
Since it requires the user to input their credentials in a browser, instead of sending stored credentials from the client, it’s also one of the more secure flows.
- The client makes an access request, opening a browser with some parameters to Azure AD’s authorization endpoint. The
response_typeparameter is set tocode. - Azure AD prompts the user for authorization, to grant the client’s request.
- The user logs in with their credentials.
- Azure AD verifies the credentials and responds with an authorization code.
- The client sends the code with other parameters to Azure AD’s token endpoint.
- Azure AD responds with the access token matching the requested parameters.
The method that Azure AD uses to respond with the authorization code is actually a HTTP redirection, by default with the code as a parameter in the URL. This means that the client needs to be able to interact with the browser or listen for the response, and also means that tools without browser functionality on their own are generally not suitable clients for this flow.
What about the PowerShell command
Connect-AzAccount?
It actually implements MSAL, which implements the browser login interaction as a reusable library. We could use MSAL directly, and it’s also what I use in my lightweight PowerShell module AzAuth built for the specific purpose of retrieving access tokens.
If we’re talking PowerShell in an environment we’re in control of, we can also technically open a HTTP listener on a port, send http://localhost:<port>/ as the redirect_uri in the flow, and then pick up the authorization code from the response query parameters. At that point though, I would use AzAuth instead. 😉
Flow Example
If we want to use this authorization flow from our client, app or script, we must first assemble the URL with the parameters needed. We then need to open it in a browser for the user so that they can log in. Our app must be able to pick up the response when it’s sent to the redirect_uri, which must also be registered with the client application in Azure.
To understand it better, let’s go through it together as a step-by-step process.
            https://login.microsoftonline.com/common/oauth2/v2.0/authorize?


            response_type=code&


            client_id=1950a258-227b-4e31-a9cf-717495945fc2&


            redirect_uri=http://localhost:1337/&


            state=pipe.how&


            scope=https://graph.microsoft.com/.default offline_access openid
Above I’ve detailed a URL split into separate lines for each highlighted parameter.
- The
tenantendpoint is set tocommonas part of the URL path - The
response_typetells Azure AD we’re using the authorization code flow - The
client_idis set to the id for Azure PowerShell, which is public - The
redirect_uriis where our app would listen for the auth code response - The
statelets us keep track of where the token was requested in our app - The
scopehas multiple space-separated scopes specified:.defaultfor Microsoft Graph as the resource, which we specify by URLopenidto get an id token for the useroffline_accessfor a refresh token, allowing us to prolong access
Copying the URL and parameters above into a browser will present us with the Microsoft login screen that we’re used to. Feel free to try browsing to the URL including the parameters!
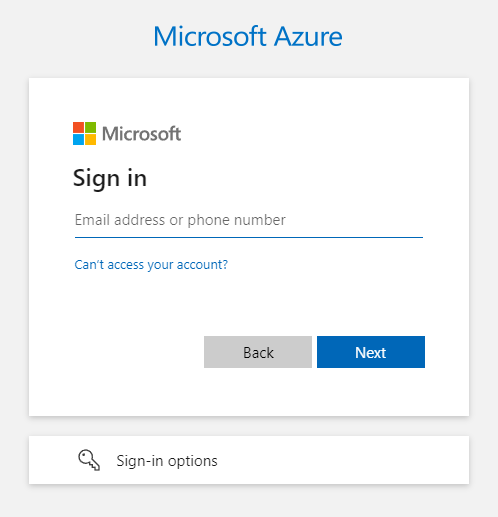
The next time you’re logging into a Microsoft service, before logging in, have a look at the URL to see what’s happening in the request!
If we log in, we will be redirected to a page that doesn’t exist (unless we happen to be hosting something on port 1337). Even if it looks like the response failed, we can see that the browser URL actually contains the auth code in the code parameter, as well as the state and other response data.
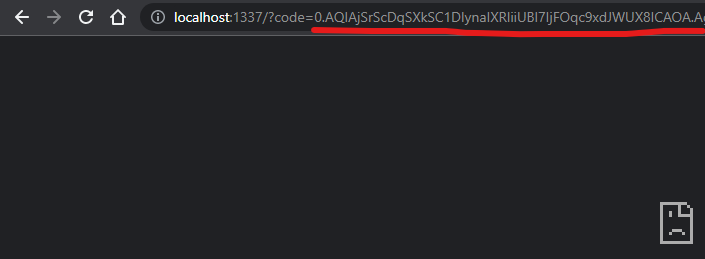
Below we can see the full response.
http://localhost:1337/?code=0.FpRLdsfaTZUV9gMYjM8UJSZWPRWSluuKoOnnnyTV5GQ40owU7of.FiI35bVntzK--VBuEkczkCZd5WjcD4miFDAQ_B6nMp_vLJr4gJ5FnjE5x8PXCwu5HPpx4YSSTXfQN5reyDznbhry2EsCrwhlQhmRkAHiVhMuJUVdWuFU3NazW81vNOSdyCGGAD-9TqOCPpKRCJwSJC8pTmnSgvBAuCcQ5Fy598wo0Gzf-WitMBwhMV9QiEJY5ppfiYV3LxgJbfDmvd1Au7_XW7dnLdIUxpJLFMF-pY6QnuffTEhiqYp1Ed_cxuLLOv4s9zP0BmgdxXlATChSllZZark4I1HXPB2B15m-tQREsXlVTHKvANwPb9rlTcuaRNRbfeZ-KmXJRWWp3TDf5Kg00JboyIO82hZUlDvosPFjzLzzvhrUBXTKCybRAx7Z0tVXruotrgwbwZKOsv8lbMPo_Ek7fg1lAvnaeIyspWFZsHoPOdiOn3jajWmTH8mQoXALpp5DdLO4n3BuLgqlIxLQgItJP2NnHYPxHte5HKRHj4nA6cs64kI8fV7rCQJzE7DhoTdVxlESFJto9YyYFqai22iyS-2GrL9N6RDBHRS3rF9jhuZniBCjsgRgOqYUB_hB9AYdytNJZoOiaM0TvLvozBFed5P4bwjXc5orRHFBuZTCgnhUJfaEIT6SbgCNkRAWsaFMHjMr-wY6zwbDiYWGF5M0NNKMtjprkpQtcT2MINNQ6P-NEUH9dqJhAjOZnK2ilY4F1WmUu9RynOECtLrl6-AhlT8xBAZ4h6eM9ryECz31m0AS9BA-rsq1sIkaBfWeFJcQw55XNNcPNd4KnBn9mqE4qJrMbz4kyChd5PINySoohFclgEF2d6muWccpVqGgDVHifHrMDMFOoGp5nvMiC-N4k1N6HKy-iWOa_X6b8nCEyh8QvtylzxBaIFEuQW4odqNucL6avfwArr_4IpXtPNRocBWelxVkF150b2vRTEqgtly0Yu8i3AFK2HOUHElO68UlZJqztshjkJTByF8MBaTYkF7LPoY9e7ujzTDZumBNZKhgeNzsAnG-9ue-M_bTHCn9e5KlDDoJ3dgAYkYrYEyfg2Wbav6leGnNUuZL2oimxR-Wu3UKuUQ2u6hp5YMk9i7ftPGmwic5KXCVZ4Jb3LaoY6u5iXdQeQe0pkH5vBGk0w-GqC-ocwIMrlJwco0EHEkO0gefXpS4Wuow8PzP9nFbnLkDStwTcINiiQebvwr-LVxlT9IRrK6_XQLW55&state=pipe.how&session_state=7850f822-0daf-4871-b2ad-c0bf9c6935de
Once we’ve copied our auth code from the response above (or parsed it using our client), we’re one request POST request away from getting the access token, which I will show in PowerShell below. If the application we use is confidential instead of public, we also need to provide a client_secret in our request.
$Body = @{
    # Telling Azure AD that we're using the auth code flow
    grant_type   = 'authorization_code'
    # Client id must be the same as requested for the auth code
    # Example below is for Azure PowerShell
    client_id    = '1950a258-227b-4e31-a9cf-717495945fc2'
    # If our client application is confidential, we also need client secret
    # client_secret = 'abcdef123456'
    # Scopes must be the scopes requested for the auth code, or a subset
    scope        = 'https://graph.microsoft.com/.default offline_access openid'
    # The code from the browser in the previous step
    code         = '0.FpRLdsfaTZUV9gMYjM8UJSZWPRWSluuKoOnnnyTV5GQ4...'
    # Redirect uri must be the same as for the auth code
    redirect_uri = 'http://localhost:1337/'
}
# Specifying tenant endpoint as "common"
Invoke-RestMethod 'https://login.microsoftonline.com/common/oauth2/v2.0/token' -Method POST -Body $Body
Running the code results in a response containing our access token, or bearer token. This token is now our short-lived (usually an hour) string which we can use to call APIs in Azure, defined by its scope and resources.
In this case we requested the .default scope for Microsoft Graph which will grant us all permissions under the Microsoft Graph resource that the app has been granted (in this case Azure PowerShell), but we could also request a token for more specific permissions. We also have information about the user account thanks to OpenID Connect.
If we wanted to call other APIs than Microsoft Graph we would have to change the resource we requested the token for originally, such as Azure Resource Manager by specifying https://management.azure.com, or Azure Key Vault with https://vault.azure.net.
Apart from the default scope for Microsoft Graph, we also requested other scopes separated by space. Specifying offline_access as one of our scopes will also request a refresh token, and the same goes for openid for an id token.
token_type     : Bearer
scope          : email openid profile https://graph.microsoft.com/AuditLog.Read.All https://graph.microsoft.com/Directory.AccessAsUser.All
                 https://graph.microsoft.com/.default
expires_in     : 3626
ext_expires_in : 3626
access_token   : eyJ0eX5ZOF62DmhNRJMdLzQe3DUNh2gVJtFiGbYHbexQGY7e3oX42qzdiCofACivsrs9k2Bh5NzFXvflFLtP4oJ4L3szrdgulvLMlr4GwYNZGvjOXLdIX7oCywG0bSqeNYlPb
                 pqdtSnCp3yNc5M6kk9arqaDQAymQrPscXkoMXeoTDPIZqsvEfshARFvEYFsgDig4FDZJCzT.eyJdE9WS6QFn6q8AY73NtAAW2BFEoAmghAAe1c7I4ttHanZkDBtUbEtfsAX6b
                 Ycll1wXTYNT1BhulWV26Gn0HiTz9CXpOM6i586Cw9mZ73SH3gPpUfKsEHa8qwn3SwlAjrXbOtPtmzWfQH2wUGdTjyFuyNnEPhmO3bfxrSl5kfLB44L50m8rPvoECrALHXb...
refresh_token  : 0.AQIAQlcOnozlzaRJYyo5YQkAlJ6L0qukwqUJBuu8vu36tbWSgk8.yo08ZdEuPVk--zxcQUDQgkxtVfA80PO7XU0U_pDreNBcz101RBa89iocXXNogKJz6WZBaGG5vTBc7v3
                 g9jqCn_m_dRE_-Gv7ntJURzzdu6DQEFKu2yzP2M4B40D_OrAIuFUwh5muoQn4hoCriYfg4lIxxn0tdObxxm_OPqJMK_FbtCKAvtIUZHweALNXJxyJ98qmSMTwb5H4fhcWM4BR
                 fFCz9EOFpbFjBIl4qFZCFq3mRf95X8IdpOOinolEWoCNWwNdEGSdly0ZwBo2nGsVE4YPZO56TaXdINHOncxmm3-uMR87ukbFVARvKsUViF6lFsJcjtc7H7GfX-BLMrT7QL...
foci           : 1
id_token       : eyJ0eXAqouwogtaQnvRxYjEunjCq1zgJrcpQr3pzkyRoNgZmWyRYWKJtmv3GbkBP0r3dpKobXcGIUDPj68XU.IdSiIMVEOHmVgm8Ek04k2BEknSpcmEsHxf4HYOc94Ufmo6wl
                 bohspvSi4PTPbvP49sXJh8q9DTETOBsyZzHDvJhZ2JxqossNIknJL2q2arUeDd6YSN8aY4jdqw5YiT8D4VB69738Tvk3GnZcRWJ59LpD3oICdbLq57h4ih45RBHcjNH6wl40x
                 q04xZhEi2KaCHpRqUNIgMp0UBxKV23JMrhfYNgAU3lcm1mSnOy3YzjLQ0iLAlWFPjsZ1C4K0JgOgpvXz5qM7l455hI6SnWK2mGzVjObhjRp85y5u6ZlmjApIyDdLBoxZBL...
We can only get access tokens scoped to one specific resource at a time, such as Microsoft Graph or Azure Key Vault. If our client needs to work with more than one resource we can specify multiple resources in the scope parameter in the original authorization code request, and then request one access token for each resource separately but with the same authorization code.
As we can see, this flow isn’t optimal for PowerShell unless we implement a way for us to interact with the browser through the code, such as MSAL. It’s still the most common flow we encounter, and understanding it helps with understanding the other flows as well.
If we want to learn who the user is before getting the access token, there’s a mix of this flow and the Implicit Grant flow, known as the hybrid flow.
PKCE
PKCE stands for Proof Key of Code Exchange, a later extension to the Authorization Code flow discussed above, and is now recommended to use wherever possible because it increases security.
In a similar way to how the state parameter helps prevent cross-site request forgery attacks where someone intercepts the auth code response, PKCE takes it to the next level by adding two more parameters to the auth code exchange.
| Name | Description |
|---|---|
| code_challenge | A secret string called code_verifier, hashed with SHA256 if the client app supports it. |
| code_challenge_method | S256, or plain if the client app cannot use SHA256. |
It’s a clever solution that works in a similar way to verifying cryptographic signatures such as certificates. We define a string known as the code_verifier. In a real scenario this string should be long and complex, but for a simpler example let’s take the string secret123.
Using SHA256 as a one-way, non-reversible function, we can hash secret123 into fcf730b6d95236ecd3c9fc2d92d7b6b2bb061514961aec041d6c7a7192f592e4. The hashed string becomes our code_challenge, which is sent to the Azure AD as the Authorization Server in the flow.
Azure AD will bake the code_challenge into the auth code response, which we use in the request for the access token. The clever part here is that we also send our original code_verifier to Azure AD, alongside the auth code. Before Azure AD gives us an access token back, it verifies that using SHA256 on the code_verifier becomes the same hashed code_challenge string, proving that no one modified anything along the way since it would have broken the auth code.
If you read Microsoft’s example requests for the Authorization Code flow, you will see PKCE being used and recommended.
Client Credentials
Another common flow, and a good choice for solutions without user interaction, is the Client Credentials flow.
To use this flow we must have an application registered in Azure AD, and have access to the client id and client secret (or a certificate) of this application. Read here to learn how to create credentials for your application.
The flow is very simple. We send the credentials of a registered client in Azure AD, and get an access token as a response. The downside of this flow is that we need to have the credentials of the app, which must also be stored securely. We can also use this flow for federated credentials, if we have an application in another system that implements OpenID Connect.
Flow Example
In this example we’re using PowerShell to execute the flow with a client secret to get our token. We don’t have the credentials of the app registration for the public Azure PowerShell app that we used before, so I’ve created a new app for this example. If you also create a new app, you will need to handle consent.
$Body = @{
    # Telling Azure AD that we're using the client credentials flow
    grant_type    = 'client_credentials'
    # Client id is the same as application id in Azure
    # Set this to the client id of your own app registration
    client_id     = '01521322-6424-61af-8bc3-ab3253cba294'
    # The client secret created for the registered app
    # Set this to a client secret of your own app registration
    client_secret = 'HK_ub~xUMs5Ha~8zldTm8SwKe3sHewW6gDy4livX'
    # Scope must be "resource/.default" for this flow
    scope         = 'https://graph.microsoft.com/.default'
}
# In this flow we must specify tenant endpoint by id
$Tenant = 'adbf1538-4291-4fa0-93bc-c35a52b46a51'
Invoke-RestMethod "https://login.microsoftonline.com/$Tenant/oauth2/v2.0/token" -Method POST -Body $Body
Running the code above will execute the client credentials flow to grant us a token for all scopes that our app has non-delegated permissions for. With this flow, there’s no option for refresh tokens since there’s only one step in the token exchange. We also can’t request an id token, since we’re using our app credentials.
token_type expires_in ext_expires_in access_token
---------- ---------- -------------- ------------
Bearer           3599           3599 eyJ0AAMG2eoNdg7qhQV2PY6Nz9Vtjtfgb58oNhTRmYj9bCWT2LM9QMa5N1ThR3bc7j6zf9vR6XA...
As mentioned before, we can also execute this flow using a certificate or federated credential instead of a client secret.
Device Code
What about a situation where we don’t have a good solution for storing a credential, but also don’t have the possibility to login using the previously mentioned Authentication Code flow because of the environment or device?
The Device Code flow is designed for situations such as logging in using a separate device, or in a console environment where we can’t browse.
(if User logged in) end
- Our client makes a request to the device code endpoint.
- Azure AD responds with a URL and two codes, one for the user and one for our client to poll for the access token with.
- Our client displays the user code and URL.
- The user browses to the URL and inputs the code.
- Azure AD prompts the user for a login.
- User logs in and authorizes the requesting client application.
- Our client sends the other code, called device code, to the token endpoint to see if the user has logged in yet.
- If the user has logged in, we get the token, otherwise we repeat the previous step after a delay.
Flow Example
To use this flow we want to implement some logic that polls the token endpoint on an interval, but to start the flow we only need a few parameters.
$Body = @{
    # Client id below is for Azure PowerShell
    client_id = '1950a258-227b-4e31-a9cf-717495945fc2'
    # Default permissions for Graph, also getting refresh and id tokens
    scope     = 'https://graph.microsoft.com/.default offline_access openid'
}
# Specifying tenant endpoint as "common", save response for next step
# Query parameter "mkt" allows us to specify culture code to localize the prompt message for the user
$Response = Invoke-RestMethod "https://login.microsoftonline.com/common/oauth2/v2.0/devicecode?mkt=en-US" -Method POST -Body $Body
Write-Output $Response
Running this code in PowerShell will result in a response with some data that lets us prompt our user for a login using a specific URL.
user_code        : CYEL6NBMF
device_code      : NVQJUGTPYRW0--ToIlDfcDkq5RrNpfojuJKiMrBGpTcZhU92bpLbAef_m2uk877mQZyPZtiM5Tl7kQI3_abmWtHs0cfkCvq2qagJ
                   Tb8tGgjvoYYhjZ9v12ckEDBHLKTnfVPDlvVN7HPn-2REWqJrOsKS55difa0DLje78m7828Wc-5-ypqaT1CdthMPmzF28oo8euXr6
                   gzWNe8SBkG013W8ca1f73f1XtknsN2d6xTUghI99FO84Ypb3gB4TdnclqDklbt6zdMzFunwjszwXwf02IZCKxXLu6fjtZpNGWrOf
                   DU7fSltj_1mz1Xq7-GyN9lS1sBKhv8m83njQXfskqptUHdwKflp66zw3VF1O-tBHpy5HfXu14_4LHjWuh57uJ3IuxZ6K0ad4JbTK
                   Y3NLC22BgGNaH-M86XWt
verification_uri : https://microsoft.com/devicelogin
expires_in       : 900
interval         : 5
message          : To sign in, use a web browser to open the page https://microsoft.com/devicelogin and enter the code
                   CYEL6NBMF to authenticate.
We can see that we get the following information in the response:
user_code- The code that our user needs to input in theverification_uri.device_code- The code we use to poll for a token to see if user logged in.verification_uri- The URL where the user inputs theuser_code.expires_in- The number of seconds before the codes expire.interval- The number of seconds we should wait between token polling.message- A message that we can display directly to the user.
When we’ve presented the message to the user, our client needs to start polling the token endpoint, until the user has signed in.
# Prompt the user to log in using the code and url in the message
Write-Host $Response.message
$Body = @{
    # Telling Azure AD we're using the device code flow
    grant_type  = 'urn:ietf:params:oauth:grant-type:device_code'
    # Client id must be the same as the devicecode request
    # The one below is for Azure PowerShell
    client_id   = '1950a258-227b-4e31-a9cf-717495945fc2'
    # The device code from the previous response
    device_code = $Response.device_code
}
# Setup hashtable with parameters for splatting
$ParamsSplat = @{
    # Tenant endpoint must be the same as in the devicecode request, in this case "common"
    Uri = 'https://login.microsoftonline.com/common/oauth2/v2.0/token'
    Method = 'POST'
    Body = $Body
}
# Run this code at least once, and until user logs in, declines or the flow expires
do {
    try {
        # We expect this to fail and move us to catch block until user logs in
        $Result = Invoke-RestMethod @ParamsSplat
    }
    catch {
        # The error reason shows up as JSON
        $ErrorMessage = $_.ErrorDetails.Message | ConvertFrom-Json -ErrorAction SilentlyContinue
        # Output the error status
        Write-Error "Token not available, status is '$($ErrorMessage.error)'."
        # Wait for the number of seconds suggested in the original response
        Start-Sleep -Seconds $Response.interval
    }
} while ($null -eq $Result -and $ErrorMessage.error -eq 'authorization_pending')
# Output the result once user has logged in
Write-Output $Result
By running this code above we’re going to ask the user to login, and loop until they have, or until the flow has completed or failed because of other reasons. The user could for example cancel the flow, or the flow could expire.
            Write-Error: Token not available, status is 'authorization_pending'.


            Write-Error: Token not available, status is 'authorization_pending'.


            Write-Error: Token not available, status is 'authorization_pending'.


            ... etc
We can write the error status like this, but we probably don’t want to do that in a real scenario since we will poll for the token very frequently. We can also filter on other expected errors for more granular control of the user experience. When the user has entered the code and logged in, we will get the tokens in the response, and we can start using them.
token_type     : Bearer
scope          : email openid profile https://graph.microsoft.com/AuditLog.Read.All
                 https://graph.microsoft.com/Directory.AccessAsUser.All https://graph.microsoft.com/.default
expires_in     : 4182
ext_expires_in : 4182
access_token   : eyJ0eXAiNhKpIkvPtzTaUKtSrPAg2v56CE35mSLFT2mZKv6IWuoXf4AviIayuUdBQuxfhL9i0E7IsnjaaDg2UAqXfqusAtVETx9Lri
                 PypUVkaWTEihqjhach2dLHSFlU7DoLpe90YlRhk5q2rbBuqrxqZIcZfXR17e76tqZAHDSUYqF7KNq8xDAkU9WQTu2qF1RdrUT3tCoD
                 .cuFuDpQBsKX1KC6iiycYKa9zvfs0IAaBDOk021xeRfm39XaqJexsUoyg9KVvrUVrbkIxqmY0rcqLSSOUb2pbDx5kbtNN6Gj55f...
refresh_token  : 0.AQIAjiu7GsQSzBRB6DV2nw4fGUV66sW5APPAilvlnzKKNOoGmOc.TaXiD0YG6vs--axULam0d8b7mPdU3k5Ss3xB_4g7UF-CSPcu
                 LnLtGz2gkuJSNifbvMIx9SGXVRZe_zwS3ImkSP8oE016kl_txvGxukh1wJ4Cv2bmodm0zi6wT8cueW1JqFYtxEMfKt7xSJt-qcmnti
                 fvmFYCzkpUewVCnwR4S5K8OzGTpqT_rSjVyNMDB5Qc6MMxNslxfLRrN1o9E8kr5zE19SMls_bA1m5ia57Mf7FuBZLuT8b3iHQv0...
foci           : 1
id_token       : eyJ0eXAi9BrRokUviQ9wc0wUd5O108lnsY6bIEyHk6FLTJ5cSl1ThdEgoBGrRQHF2UtObb8nwFvYdy9LoIv9.nJx6UjAvAwIAysNcW
                 9J90QbgM1VVr3XOmFwxkcXBsrUemCa2AGq70eTvIn7i5QpUk4Mdk0ZunmrbS6fpkccv5LOinq5H24s3lTw0s3MqRdupXp23pHk8Yyg
                 of4Tmoft9NAT2Q3gXDHcfwJwxSpbGfJXYBxeXruHRQ5n0KAT5dkHj8pVZowMVeY035KqvK3ODssvrK5C7WSofsUF2rEer6AwZl6...
On-Behalf-Of
The On-Behalf-Of flow is a flow that fits scenarios where our user has gone through an auth flow already and has a valid token, but we have several applications or APIs in the chain of API requests. An example would be where we have a client application such as a script or a mobile app, which talks to API A, which in turn needs to call API B as the user.
Instead of API A sharing the token with API B when it was issued for use in API A, Azure AD can issue a new token for API B to API A. Unbeknownst to the user, their authorization will have seamlessly traveled all the way to a back-end API and back, regardless of original scopes requested.
Client ID & Secret
to /token AAD->>API1: Token B response API1->>API2: Request with Token B API2->>API1: Response with Data B API1->>Client: Response with Data A and B
- The user executes any token grant flow.
- Azure AD responds with an access token for the client, to use for API A.
- The client makes an API request to API A, using this token.
- API A knows that it needs to request data from API B in the context of the user to comply with the client’s API request, but it should not share the token provided by the client with another party. API A instead asks Azure AD for a new token to use, scoped to API B. To ensure that the connection to the user’s context isn’t lost, the existing token is provided as part of the request.
- Azure AD authorizes API A using its client credentials, but also checks that the token that API A provides was actually scoped to API A. This ensures that we can’t run this flow with just any token provided. Azure AD responds with a new access token which should only be used for API B.
- API A uses the new token to call API B for data.
- Since API A has a valid token for API B, it responds with the data.
- API A has now successfully called API B behind the scenes, on behalf of the user, and returns the data that was requested by the client.
It’s important that the tokens are never used for anything else than they were requested for, and are not relayed to any other party.
There are a few nuances regarding scopes, consent and token audiences when performing this flow, so it’s important to keep track of which resource the tokens are requested for in the different steps, but it solves the challenge of handling authorization between APIs without the user needing to be involved.
Read here to learn more about access tokens, claims and other data inside tokens.
Flow Example
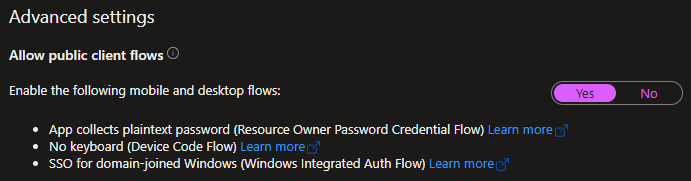
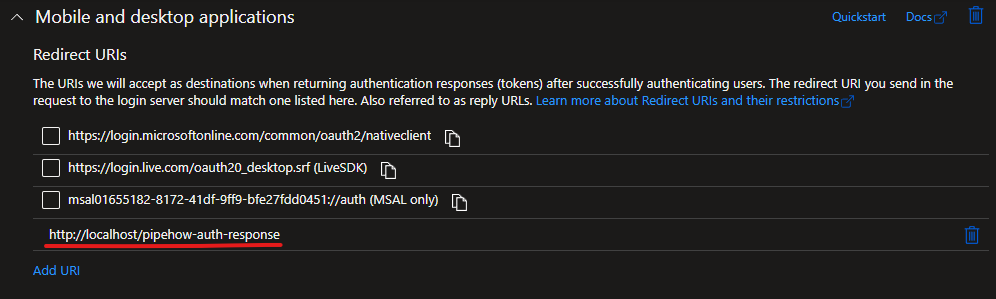
To try this flow, start with registering a single-tenant application in Azure AD. I’m creating mine as a public client and registering a redirect_uri accordingly, to show the difference to earlier flows, but if you create it as confidential instead of public you will also need to create a client secret.
The next step is to go through a flow for a token for the app, I’ll use the Authorization Code flow.
Make sure to specify the scope to be the .default of the app by the client id. This means that our resulting token will only have the permissions of the app itself. Since we haven’t assigned any permissions, our token will intentionally have no useful permissions.
Since it’s a single-tenant app we can’t use the common tenant endpoint, but we can use organizations or a specific tenant.
            https://login.microsoftonline.com/organizations/oauth2/v2.0/authorize?


            scope=01655182-8172-41df-9ff9-bfe27fdd0451/.default&


            response_type=code&


            client_id=01655182-8172-41df-9ff9-bfe27fdd0451&


            redirect_uri=http://localhost/pipehow-auth-response&


            state=pipe.how
Copy the auth code from the response in the browser and enter it in the PowerShell code below for the token request for the app. If our application was confidential we would also provide a client_secret in our request.
$Body = @{
    # Telling Azure AD that we're using the auth code flow
    grant_type   = 'authorization_code'
    # Client id here is a public client registered for this example
    client_id    = '01655182-8172-41df-9ff9-bfe27fdd0451'
    # Specifying the default scope of the app, which won't include Graph
    scope        = '01655182-8172-41df-9ff9-bfe27fdd0451/.default'
    # The code from the browser in the previous step
    code         = '0.lXXZxZBTPe4g9YMAbXWeT6v...'
    # Public redirect uri registered in the app, same as previous step
    redirect_uri = 'http://localhost/pipehow-auth-response'
}
# Specifying tenant endpoint as "organizations"
$Result = Invoke-RestMethod 'https://login.microsoftonline.com/organizations/oauth2/v2.0/token' -Method POST -Body $Body
Write-Output $Result
Running the code will give us an output with an access token. We can inspect the access token using jwt.ms and see that it doesn’t have any permissions for Microsoft Graph. If we were to try this with an API request, we would get an error.
For the on-behalf-of flow, let’s assume we had an API which the user sent this token to for authorization, but the API also needed to talk to Microsoft Graph.
This API could then use a request like the following code to check out a second token in the context of the user, which it could use for its own API requests. Here we need the client credentials to get a token, regardless of if the app is registered as confidential or not. Compare the request with the code above to see the differences.
$Body = @{
    # Telling Azure AD we're requesting a new JWT
    grant_type          = 'urn:ietf:params:oauth:grant-type:jwt-bearer'
    # Telling Azure AD we're using the on-behalf-of flow
    requested_token_use = 'on_behalf_of'
    # The client id of the app, must be in scope of the first token
    # Replace this with the client id of your own app
    client_id           = '01655182-8172-41df-9ff9-bfe27fdd0451'
    # The client secret of the app requesting a new token
    # Replace this with the client secret of your own app
    client_secret       = 'wRb8Q~WiHguAqRNqdyQ~EVSDDAmI1s2GOSKnWbtj'
    # The token retrieved in the previous step
    assertion           = $Result.access_token
    # The scopes requested for the second token
    scope               = 'https://graph.microsoft.com/.default'
}
# Specifying tenant endpoint as "organizations"
Invoke-RestMethod 'https://login.microsoftonline.com/organizations/oauth2/v2.0/token' -Method POST -Body $Body
By making this request, the app can get its own token for backend APIs or requests that the user does not need to be aware of.
token_type     : Bearer
scope          : profile openid email https://graph.microsoft.com/User.Read https://graph.microsoft.com/.default
expires_in     : 3081
ext_expires_in : 3081
access_token   : PvHGVIajT5QjUBcN4L1wj4XKT0IpX0F5A8AgTuE9xAOAZBrUFpPBf0z1Cb0tWV1Nk5aXw6c9gDIwQedKvPJIXcMWbZH53CzSI
                 01efPkayaf8Z1kdxZdKWpR1ouqhmD6yUSrWNLYlaZp28koTlOWdDlPLOoiECmTuuMDhZOWEUv46EbvVeTL2AXaCMLKs5erKnY
                 Uz6tCeey36.DlhtYPLljSJqBbBkGxTpSbIJEZ4DV1q4P669ht8K4Oixysht0s5K3FgzjfhZViRGS155w8vHc4dSNjzFyjL...
This token can now be used for reading data from Microsoft Graph, even though the user was never involved or requested this scope. This also shows why it’s important to only give app registrations the minimum permissions they need.
We can use jwt.ms to verify this token like before, but be mindful of managing tokens with more sensitive permissions. It’s also important to point out that this token should never be sent somewhere else, it’s intended only to be used by the API for backend data operations needed for whatever was requested, and then discarded.
Implicit Grant
This flow is not recommended to use, and is considered legacy.
The Implicit Grant flow can be used in a couple of ways, but the defining aspect of this flow is that we get tokens directly from the /authorize endpoint, instead of getting a code response like in the Authorization Code flow which we send to the /token endpoint. Since it’s using the /authorize endpoint, we’re also bound by the requirement of getting the response as a redirection, meaning we must be able to listen for the response in our client.
Using this flow, the HTTP redirection sends the token as part of the URL fragment which ensures that it never gets sent to the server of our redirect_uri, so it’s up to our client to pick it up.
One reason not to use this flow is that responding back with a token directly to the client using a HTTP redirect comes with inherent security risks, but it used to be recommended for things like applications written in JavaScript that aren’t able to store refresh tokens securely. Instead of getting a refresh token and using that for long-term access, this flow gets a new token behind the scenes by using existing cookies in the browser after a user has signed in.
It’s more and more likely that third party cookies are disabled in modern browsers for security reasons, so it’s recommended to use the Authorization Code flow with PKCE instead of this.
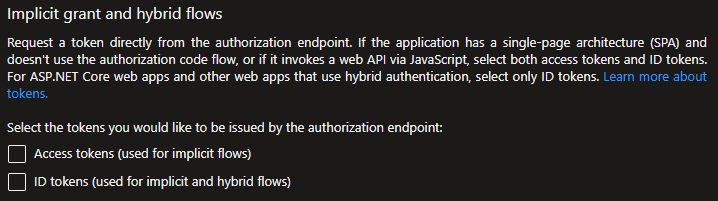
To use this flow with an app registered in Azure, we must also enable settings for implicit and hybrid flows, depending on which token we’re interested in.
Enabling ID tokens here lets us use what is known as the hybrid flow, a mix between this flow and the Authorization Code flow which allows us to identify the user before getting an access token for them.
The implicit grant flow is split into two parts, first we request authorization from the user, and then we indirectly use the cookies stored in the same browser session.
- The client makes an access request, browsing to Azure AD’s authorization endpoint. The
response_typeparameter is set totoken,id_tokenor both. - Azure AD prompts the user for authorization, to grant the client’s request.
- The user logs in with their credentials.
- Azure AD verifies the credentials and responds with the requested token(s) in the URL fragment of the HTTP redirection to the URL specified.
- When the Access Token expires, the client sends a new request to Azure AD in the same browser session. The browser will find available cookies and use them.
- Azure AD responds with a new access token.
Flow Example
If we want to execute the flow, an easy way of trying it is to start a new private or incognito session in your browser. We can use the client id of an application that Microsoft has set up with the implicit grant token settings enabled, and specify the redirect_uri registered in this application, any other URL will not work. Note how we request the token types in response_type, and how we provide an example value for the required nonce parameter.
            https://login.microsoftonline.com/common/oauth2/v2.0/authorize?


            client_id=6731de76-14a6-49ae-97bc-6eba6914391e&


            response_type=id_token+token&


            scope=https://graph.microsoft.com/.default openid&


            response_mode=fragment&


            redirect_uri=http://localhost/myapp/&


            state=pipe.how&


            nonce=1337
Opening this URL in the browser and logging in will give us an access and id token, but more importantly it will create the necessary cookies in the browser.
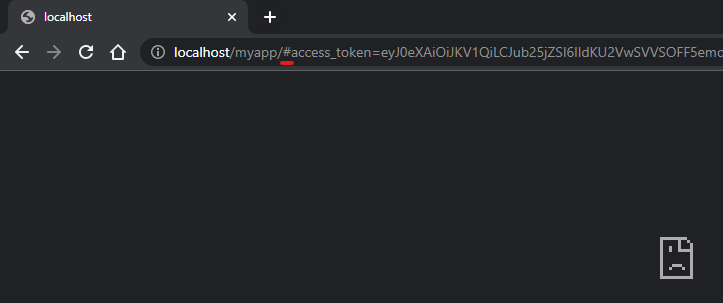
Note the underlined # symbol, which marks the start of the URL fragment in the response. This means that the data will never actually leave the browser and be passed to the application hosted at the URL, in this case http://localhost/myapp/. Our client application monitoring the browser has to retrieve it.
In the same browser, we can now execute the implicit grant flow and get new access tokens by letting the browser handle authorization using cookies. Just make sure to replace [email protected] with the account you used for logging in before, bypassing the account selection and getting a token non-interactively.
            https://login.microsoftonline.com/common/oauth2/v2.0/authorize?


            client_id=6731de76-14a6-49ae-97bc-6eba6914391e&


            response_type=token&


            scope=https://graph.microsoft.com/.default&


            response_mode=fragment&


            redirect_uri=http://localhost/myapp/&


            state=pipe.how&


            nonce=1337&


            login_hint=[email protected]
We can execute this flow to get new access tokens even when they’ve expired, as long as there are valid cookies in the browser session.
Password Grant
This flow is not recommended to use, and is considered unsecure.
Also known as the Resource Owner Password Credentials Grant or ROPC, this flow is just what it sounds like. This flow lets the client post the username and password of the user in plaintext to retrieve a token.
It’s incredibly simple, but brings a lot of risk compared to most other flows in terms of security. There are a lot of limitations in this flow, such as:
- It only works with specific tenant endpoints, or the
organizationsendpoint. - It doesn’t work with personal accounts.
- It doesn’t work with multi-factor authentication.
- It doesn’t work for accounts without a password.
- It doesn’t work with passwords with leading or trailing whitespace.
- etc …
If that wasn’t enough to convince you, here’s how it works.
If we want to execute it using PowerShell, we can run the code below, but if you’re considering using it in a real client application I would go back to the top of this post, read it again and see if there really isn’t a better option for your use case.
If you were to need this flow, remember not to save the credentials of the user but only pick them up as input and forward them for the token request.
$Body = @{
    # Telling Azure AD that we're using the password grant flow
    grant_type   = 'password'
    # Client id below is for Azure PowerShell
    client_id    = '1950a258-227b-4e31-a9cf-717495945fc2'
    # User credentials are specified in plaintext
    username     = '[email protected]'
    password     = 'S3cr3tPassw0rd'
    # A space-separated list of scopes requested
    scope        = 'https://graph.microsoft.com/.default offline_access'
}
# Specifying tenant endpoint as "organizations"
Invoke-RestMethod "https://login.microsoftonline.com/organizations/oauth2/v2.0/token" -Method POST -Body $Body
If you’re doing everything right, you should get a result that looks something like the following:
Due to a configuration change made by your administrator, or because you moved to a new location, you must use multi-factor authentication to access '00000003-0000-0000-c000-000000000000'.
Because doing everything right means that you have multi-factor authentication enabled on your account and cannot use this flow! 😉
If you actually do have a use case for this flow, the best idea is to get a refresh token by specifying offline_access in the scope parameter, and using the resulting refresh token from then onwards, making sure to never save the credentials of the user.
Refresh Token
While not a stand-alone authorization flow, all refresh tokens are used in the same way to get a new access and refresh token pair.
If we have a valid refresh token, we can get a new access token even if our current one has expired. Speaking of expiration, refresh tokens that are used in this flow are actually not invalidated, which means that they can be valid for up to 90 days after we use them. We’re expected to discard them after use, but there’s no built-in functionality in Azure AD to do this for us. This means that a leaked refresh token is so much worse than a leaked access token, since it can refresh itself and get new access tokens, at least until something changes for the user.
The flow itself is similar to the Client Credentials flow, or the token exchange part of the Authorization Code flow.
Since we get a refresh token together with the new access token, our client app should make sure to safely discard the refresh token that was just used in the flow, since it will stay valid. Read here for more information on how refresh tokens and revocations work, and here for how to configure token lifetimes in Azure AD.
Flow Example
Executing the flow is pretty straightforward. If we go through any of the previous flows and get a valid refresh token, we can use it in the PowerShell code below.
$Body = @{
    # Telling Azure AD that we're using the refresh token flow
    grant_type    = 'refresh_token'
    # Client id must be the same as for the refresh token
    # Example below is for Azure PowerShell
    client_id     = '1950a258-227b-4e31-a9cf-717495945fc2'
    # Scope is optional here, same scope as before is used if omitted
    # Must be same as requested for refresh token, or a subset
    scope         = 'https://graph.microsoft.com/.default offline_access openid'
    # The refresh token to use
    refresh_token = '0.AQIAQlcOnozlzaRJYyo5YQkAlJ6L0quk...'
    # Redirect uri must be the same as for the auth code
    redirect_uri = 'http://localhost/pipehow-auth-response'
}
# Specifying tenant as "common"
Invoke-RestMethod 'https://login.microsoftonline.com/common/oauth2/v2.0/token' -Method POST -Body $Body
The result of the code will be the same tokens as before. One id token to identify our user, one short-lived access token for our API calls, and one new refresh token to be able to keep a user signed in without prompting them for authentication.
Once again, the refresh token used above will not be invalidated after use, and it’s up to us and our client app to make sure that it’s not leaked or discarded unsecurely. If we want to verify that this is how it works, we can run the code several times using the same refresh token and see that we get a new pair every time.
Using an Access Token
We’ve gone through a bunch of ways to get access tokens, the remaining question now is how to use them in the Azure APIs.
It depends on the API, of course, but let’s take a simple API request to Microsoft Graph as an example, the /me endpoint to get our own user info. Go through any of the token grant flows above to get an $AccessToken variable containing a token with permission to read your user in Microsoft Graph, and run the code below in PowerShell.
# Create a hashtable with parameters for splatting
$ParamsSplat = @{
    Uri = 'https://graph.microsoft.com/v1.0/me'
    Headers = @{
        Authorization = "Bearer $AccessToken"
    }
    Method = 'GET'
}
Invoke-RestMethod @ParamsSplat
If our token has the correct scopes with permission for us to read our user account information in Microsoft Graph, we should get a simple output with some information.
@odata.context    : https://graph.microsoft.com/v1.0/$metadata#users/$entity
businessPhones    : {}
displayName       : Emanuel Palm
givenName         : Emanuel
jobTitle          :
mail              : <REDACTED>
mobilePhone       :
officeLocation    :
preferredLanguage : en-GB
surname           : Palm
userPrincipalName : <REDACTED>
id                : 36730795-326a-413c-ae12-ff27b0dde4c7
Most Azure APIs work the same way regarding the auth, so once we’ve gotten a token with the correct scopes we just need to refer to the documentation of the individual APIs. They’re generally well documented, and the versioning ensures that it’s up to the clients using the APIs to upgrade the version when it comes to breaking changes.
A deep-dive on how to use the actual APIs is outside the scope of this post, but the goal is to have an understanding for how the tokens work and how to retrieve them in the best way for each scenario.
Conclusion
I wanted to write the post that I wish I read when I first started working with Azure. We could discuss the concepts talked about in this post in more detail, but instead of scoping the post to .default for all granted scopes I’ll leave you with some links that I’ve found useful, in addition to the many linked above when discussing the different aspects and flows.
I hope that what we’ve covered today has been helpful in understanding how it all comes together, for us to be able to get going with the fun part: the actual APIs.
Extra Reading
- Map of OAuth 2.0 Specs
- RFC 6749: The OAuth 2.0 Authorization Framework
- RFC 7636: Proof Key for Code Exchange by OAuth Public Clients
- Authentication flow support in MSAL
- The OpenID Configuration in Azure AD
- OAuth 2.0 authentication with Azure Active Directory
- OAuth 2.0 and OpenID Connect (OIDC) in the Microsoft identity platform
- List of Application IDs of commonly used Microsoft applications
- Abusing Family Refresh Tokens for Unauthorized Access and Persistence in Azure Active Directory